Cooking, Entertainment, Holidays

Decorate Holiday Cookies

Nothing says the holidays are coming like spending a a day listening to music and baking treats. Here are some great tips for decorating sugar cookie with flood icing.

Ingredients

  • 2 tablespoons Wilton® Color Flow Mix (or a brand you like)
  • ¼ cup + 1 teaspoon water
  • 4 cups confectioners sugar, sifted

Materials

  • Piping bags
  • Decorating couplers
  • Wilton® icing tips size 2, 3, or 4 (or a brand you like)
  • Rubber bands
  • Gel food coloring, colors of your choosing
  • Tip covers
  • Squeeze bottles with covers

To Prep

  1. Prepare your piping bags with the couplers. Cut off a small tip of the bag, and remove the ring from the base of the coupler. Put the coupler base inside of the bag, and attach the desired tip size (2, 3, or 4) to the outside of the bag. Secure with the ring to lock the bag in place, and repeat with the remaining couplers and bags.

To Make Icing

  1. Make the icing by beating all ingredients in stand mixer on low speed for about 5 minutes.
  2. If using white, place some of the plain icing into one of the piping bags, and secure with a rubber band to maintain the consistency.
  3. Take another small amount of white icing, dilute it slightly with small amounts of water until it flows easily, and place into squeeze bottles. (Tip: Make sure to keep icing covered with a damp cloth or paper towel to avoid crusting throughout the decorating process.)
  4. For colored icing, separate the remaining white icing into different bowls, and add gel food coloring. Add water in 1/2 teaspoon increments until thin enough to spread easily.
  5. Add the thinner, colored icing into squeeze bottles.

To Decorate

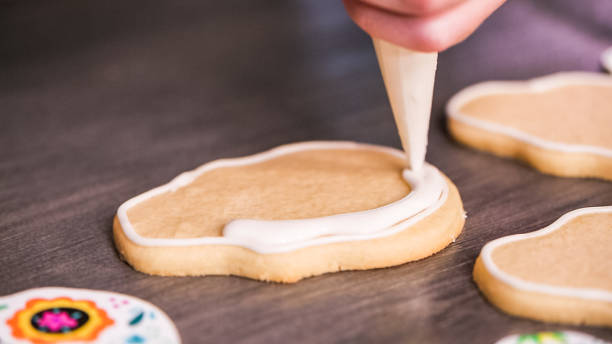
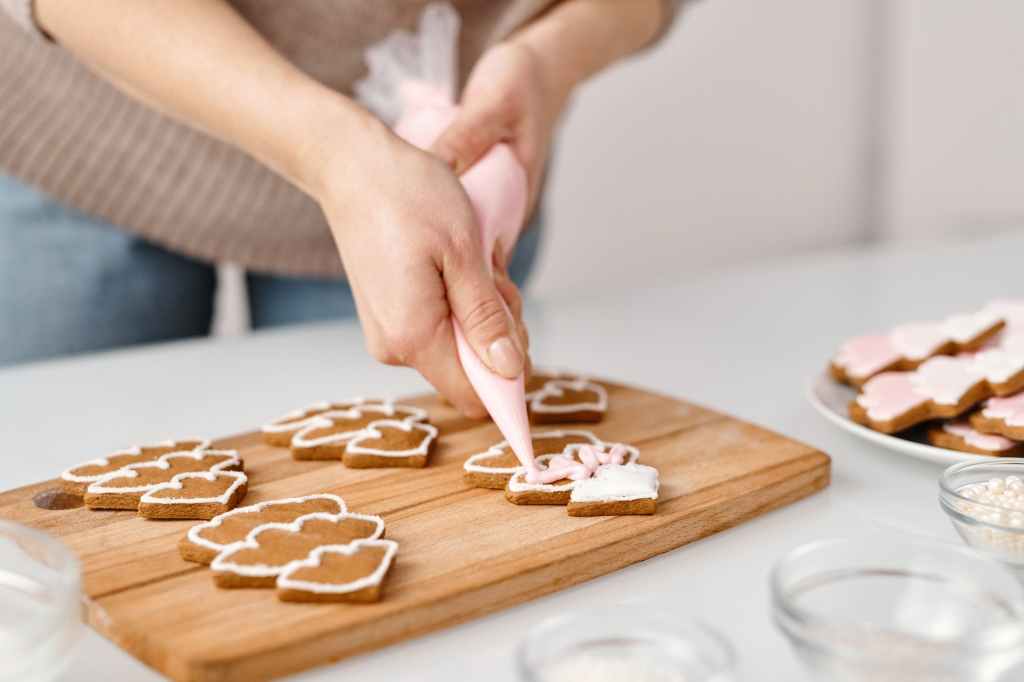
  1. Make sure the cookies are cooled before you begin decorating, and then start outlining your cookies with chosen color from the piping bag.
  2. Next, take the thinned icing from the squeeze bottles and squeeze into the inside of the cookie. Using a toothpick, spread around to make icing even. Allow the first layer to dry a minimum of 4 hours, preferably overnight.
  3. Once dry, add any additional designs on top of the first layer, using the same technique, or drawing on with the piping bag. Allow all new layers to harden overnight. (Tip: Always keep the piping bags covered when not in use.)

Cooking, Entertainment, Holidays

Halloween Cocktails, Boo!

I love to do different types of cocktails for friends and family to enjoy as we spend time together. These festive Halloween Candy Corn Martini cocktails will be a hit at our next game night!

  • 1 ½ Ounce Whipped Cream Vodka – we use Pinnacle
  • 3 Ounce Sour Mix – can be purchased, but I make my own (recipe below)
  • 2 Ounce Pineapple Juice
  • ½ Ounce Grenadine – we use Liber & Co.
  • Whipped cream for topping – homemade is fun, but store bought works just as well

Instructions

  • Combine Whipped Cream Vodka, Sour Mix and Pineapple Juice in a shaker with ice, shake away
  • Pour mix into a martini glass
  • Slowly pour Grenadine into mix so it settles at the bottom
  • Top with whip cream

Sour Mix Recipe

  • 1 cup sugar
  • 1 cup water
  • 1 cup freshly squeezed lemon juice
  • 1/2 cup freshly squeezed lime juice
  • Juice the lemons and limes
  • In a heavy bottomed sauce pan add the sugar and water. Heat over medium heat, stirring now and then. Once all the sugar is dissolved remove from the heat.
  • Pour the citrus juice into the simple syrup and mix together. 
  • Let it cool completely and strain through a fine mesh strainer.
  • Pour final product into a container. I use a glass bottle with a lid.
  • Place in the refrigerator, will last for up to three weeks.
Cooking

Balsamic-Glazed Peach Caprese Salad

Ingredients:

8 semi-soft peaches with their pits removed
Kosher salt
¼ cup aged balsamic vinegar, plus more for drizzling
3 tablespoons extra virgin olive oil
8 ounces bocconcini
1/2 cup fresh basil
2 tablespoons extra virgin olive oil, plus more for drizzling
Fresh cracked black pepper, to taste

Instructions:

On a large plate drizzle the balsamic vinegar. Season the peaches with kosher salt.

In a nonstick pan, heat the extra virgin olive oil over medium-low heat. Add the peaches cut side down and sear for 3 minutes. To prevent the peaches from sticking jiggle the pan now and then. Lift a peach to make sure it is browning, don’t let them burn. Once they are browned, remove the pan from the heat and place the peaches cut side down in the balsamic vinegar on the plate.

Let the peaches soak up some of the yumminess for a minute . Return the peaches to the hot pan cut side down, and cook over medium-low heat for another minute. Then put back on the plate with the balsamic vinegar. Let them rest for 2 minutes.

Return to the hot pan again for the third time, cook for one more minutes. Put the peaches back on the plate, cut side down, and put in the fridge for 20 minutes.

Cut the chilled peaches into quarters and place them on a clean plate with the bocconcini. Season with a bit more kosher salt, then add some fresh pepper. Make it look appetizing and pretty by tucking the basil in between the peaches and cheese. Drizzle generously with extra-virgin olive oil and a bit more balsamic vinegar.

As most of you know I always like to change recipes. I’ve made these yummy peaches a few times and have drifted off the original recipe to this version. The original recipe is from “Listen to Your Vegetables” by Sarah Grueneberg and Kate Heddings. It’s a great book!